Have you ever needed to display scientific formulas like H2O or E=mc2 in your Sanity CMS content? Or perhaps you need to add trademark symbols, footnote references, or mathematical expressions to your website? While Sanity CMS offers powerful content management capabilities, it doesn't include superscript and subscript text decorators out of the box. This limitation can be frustrating when working with technical, scientific, or academic content.
In this comprehensive tutorial, I'll walk you through the process of extending Sanity's block content with custom superscript and subscript decorators. These text formatting options are essential for various content types, from scientific articles and legal disclaimers to academic references and product descriptions.
By the end of this tutorial, you'll be able to:
Add custom superscript and subscript decorators to your Sanity schema
Create React components to render these decorators in the Sanity Studio
Implement the necessary frontend code to display formatted text on your website
Understand how to extend this approach to other custom text decorators
How to Add Superscripts and Subscripts to Sanity CMS: A Step-by-Step Guide - ContentWrap
A working Sanity CMS project (version 2.0 or later)
Basic knowledge of Sanity schemas and block content
Familiarity with React components
Access to your project's schema files
Node.js and npm installed on your machine
Solution Overview
Sanity CMS uses a system called Portable Text (formerly Block Content) for rich text editing. This format allows for structured content with marks and decorators that can be serialized to different output formats. By default, Sanity includes basic text decorators like bold, italic, underline, and code, but it's designed to be extensible.
Our solution involves:
Extending the block content schema to include superscript and subscript decorators
Creating custom React components to render these decorators in the Sanity Studio
Implementing custom icons for better visual identification
Setting up the frontend serialization to properly render the formatted text
This approach maintains the structured nature of Portable Text while adding the specific formatting options we need. The benefit of this method is that it's non-destructive and follows Sanity's recommended patterns for customization.
Let's get started with the implementation!
Step 1: Understanding Block Content in Sanity
What are Block Content Decorators?
Before adding custom decorators, it's important to understand how Sanity's block content works. In Sanity, rich text is stored as structured data using the Portable Text specification. Text decorators (also called "marks") are applied to spans of text within blocks.
The default block content in Sanity includes decorators like:
Our goal is to add superscript and subscript as new decorator options, which will be stored similarly in the content structure.
Step 2: Locating Your Schema Files
Finding the Right Schema File
To add custom decorators, we need to modify the schema file that defines your block content. This is typically found in your Sanity project directory structure.
Navigate to your Sanity project folder
Look for the schemas directory
Find the schema file that defines your block content field
The exact location might vary depending on your project structure, but it's commonly found in paths like:
schemas/blockContent.js
schemas/objects/blockContent.js
schemas/schema.js (if you have a simpler project)
If your project has multiple block content definitions, you'll need to modify each one where you want superscript and subscript to be available.
Step 3: Adding Custom Decorators to Your Schema
Modifying the Block Content Schema
Now that you've found your schema file, let's add the superscript and subscript decorators:
What we've done here is add two new decorators to the existing list:
{ title: 'Superscript', value: 'sup' } for superscript text
{ title: 'Subscript', value: 'sub' } for subscript text
The value properties ('sup' and 'sub') are important as they'll be used as the mark names in the Portable Text structure and correspond to the HTML tags we'll use for rendering.
Step 4: Rendering Decorated Content on the Frontend
Setting Up Frontend Serialization
Now that we've configured Sanity Studio, we need to ensure that our superscript and subscript formatting renders correctly on the frontend. The approach varies depending on the frontend framework you're using, but here's how to do it with the @portabletext/react library:
First, install the necessary package if you haven't already:
Terminal
npm install @portabletext/react
Then, create a serializer configuration for your Portable Text content:
components/PortableText.jsx
// In your frontend code (React example)import { PortableText as SanityPortableText } from '@portabletext/react'// Define custom serializers for our marksconst components = { marks: { sup: ({ children }) => <sup>{children}</sup>, sub: ({ children }) => <sub>{children}</sub>, // Include other mark serializers as needed }, // Include other component serializers as needed}// In your component that renders Sanity contentconst PortableText = ({ blockContent }) => { return ( <div className="content"> <SanityPortableText value={blockContent} components={components} /> </div> )}
This configuration tells the Portable Text renderer how to handle our custom 'sup' and 'sub' marks, transforming them into the appropriate HTML elements.
If you're using Next.js with Sanity, the setup might look like this:
Now it's time to test your implementation to make sure everything is working correctly:
Start (or restart) your Sanity Studio.
Navigate to a document with a block content field
Select some text and look for the new superscript and subscript buttons in the formatting toolbar
Apply the formatting and verify it appears correctly in the editor
Save the document and deploy your changes if necessary
Check your frontend to ensure the formatting renders correctly there as well
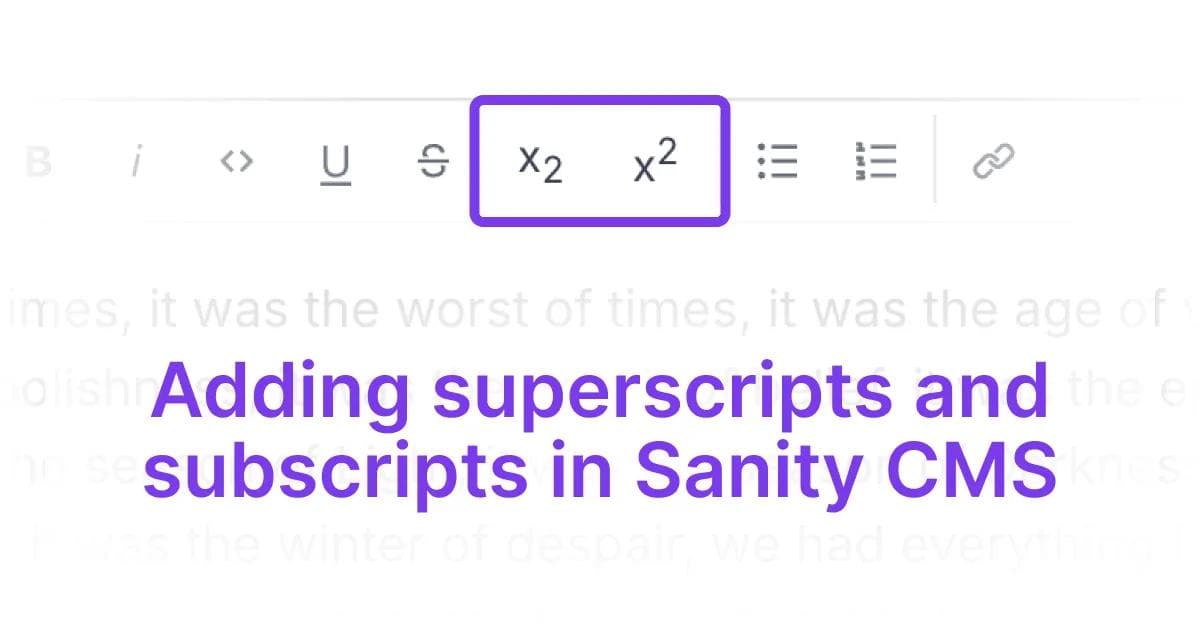
Screenshot: Sanity Studio with superscript and subscript decorators in the formatting toolbar
Common Issues and Troubleshooting
Problem: Decorators Not Appearing in the Toolbar
Symptoms: You've added the decorators to your schema, but they don't appear in the formatting toolbar in Sanity Studio.
Solution: Check that you've:
Correctly modified the right schema file
Registered the custom components with the block editor
Restarted the Sanity Studio after making changes
Deployed the changes to your Sanity Studio if you're using a deployed version
// Double-check your schema configurationmarks: { decorators: [ // Existing decorators... { title: 'Superscript', value: 'sup' }, // Make sure these are added { title: 'Subscript', value: 'sub' }, ]}
Problem: Formatting Doesn't Appear on the Frontend
Symptoms: The decorators work fine in Sanity Studio, but the formatting doesn't show up on your website.
Solution: Verify that:
You've set up the correct serializers for your frontend
Your frontend is fetching the latest content from Sanity
There are no CSS rules overriding the sup and sub styling
Problem: Inconsistent Styling Across Browsers
Symptoms: The superscript and subscript text looks different in various browsers.
Solution: Add consistent CSS styling to normalize the appearance:
/* Add this to your global CSS */sup, sub { font-size: 75%; line-height: 0; position: relative; vertical-align: baseline;}sup { top: -0.5em;}sub { bottom: -0.25em;}
Problem: Editor Performance Issues
Symptoms: The Sanity editor becomes slow after adding custom decorators.
Solution: This is rare but could happen if you have many custom components or complex rendering logic. Simplify your custom components and make sure they're optimized for performance.
Advanced Techniques
Implementing Keyboard Shortcuts
You can enhance the user experience by adding keyboard shortcuts for your new decorators. This is done by modifying your block editor configuration:
Create properly formatted citations and footnotes:
Reference to a source1
Additional information2
Footnote markers3
Product Descriptions
Display measurements and units correctly:
Screen size: 15.6"
Area: 25m2
Temperature: 20°C
Conclusion
In this tutorial, you've learned how to extend Sanity CMS with custom superscript and subscript text decorators. We've covered:
Understanding Sanity's block content system
Adding custom decorators to your schema
Creating React components for rendering in the editor
Implementing custom icons for better usability
Setting up frontend serialization for proper display
Troubleshooting common issues
Advanced techniques for further customization
These enhancements will allow your content creators to produce more sophisticated and properly formatted content for scientific, academic, legal, and technical purposes.
Don't Navigate Your Migration Alone
ContentWrap can simplify your CMS migration, with proven strategies on reducing costs, transferring data, and designing studios.
How to Solve Timezone Issues in Sanity CMS with rich-date-input: A Step-by-Step Guide
Eliminate timezone headaches in Sanity CMS with the rich-date-input plugin. Learn how to prevent publishing date confusion and ensure consistent datetime display for global teams with this simple yet powerful solution.