If you've ever worked with a global team or managed content that needs precise publishing times, you've likely encountered the frustration of datetime handling in content management systems. Sanity CMS, while powerful in many ways, has a particularly confusing default approach to handling dates and times that can lead to unexpected publishing issues and team confusion.
Consider this real scenario that recently happened to a content editor in New York:
One evening, a content editor, based in NYC, created a blog post and set the "publishDate" field to be that current day, March 10, 2025.
After publishing, she visited the live site only to find her post displaying a publish date of March 11, 2025. Confused, she double-checked the Sanity Studio, which still showed March 10.
This discrepancy occurs because Sanity displays dates in your local timezone within the Studio interface but stores them internally as UTC. For the NYC editor, 9:30 PM EST converts to 1:30 AM or 2:30 AM UTC on May 11 (depending on daylight saving time) — hence the incorrect display date on the frontend.
Fortunately, there's a solution: the rich-date-input plugin for Sanity CMS. This powerful tool stores datetime information with complete timezone context, solving these issues once and for all.
By the end of this tutorial, you'll be able to:
Understand why Sanity's default datetime handling is problematic
Install and configure the rich-date-input plugin
Implement timezone-aware datetime fields in your schemas
Properly render datetime information on your frontend
Avoid common timezone pitfalls in content management
Prerequisites
A Sanity CMS project (version 3.0+)
Basic knowledge of Sanity schema configuration
Node.js and npm installed
Familiarity with JavaScript/TypeScript
The Problem with Sanity's Default Datetime Handling
Sanity's built-in datetime type seems straightforward but contains a subtle yet significant issue: timezone confusion.
Here's what happens:
A content editor sets a date and time in Sanity Studio
The Studio UI displays this datetime in the editor's local timezone
Sanity stores the value internally as UTC
When retrieved via API, only the UTC value is available
The frontend displays this UTC value, potentially showing a different date than what the editor set
With Sanity's standard date and datetime fields, in the Sanity Studio, users set and see the datetime displayed in their local timezone. However, the datetime that is actually saved to Sanity's data lake is the datetime only in UTC timezone. This discrepancy makes working in distributed teams difficult; How do users know what datetime will be rendered in the app?
For teams spanning multiple timezones, this creates constant confusion. An editor in Los Angeles setting a display datetime of 7:30 PM PST might be surprised when their content displays a datetime of 2:30 AM UTC.
Even worse, they might unintentionally schedule content for the wrong datetime.
Understanding Datetime Storage in CMS Systems
Storing datetimes in UTC is actually a standard best practice in software development. The problem isn't with UTC storage itself, but rather with losing timezone context in the process.
Most CMS systems follow one of these approaches:
UTC Only: Store only UTC timestamps, forcing frontend developers to handle timezone conversion (Sanity's default approach)
Local Time + UTC: Store both the user's intended local time and the UTC conversion
Complete Context: Store the original input, UTC conversion, timezone, and offset (the approach rich-date-input takes)
The third approach is clearly superior for content management because it preserves the editor's exact intent while providing the technical flexibility needed for proper rendering.
Introducing the rich-date-input Plugin
The rich-date-input plugin for Sanity solves these issues by storing a rich data structure that includes:
The local datetime as input by the editor
The UTC conversion
The timezone identifier (e.g., "America/New_York")
The offset from UTC in minutes
This comprehensive approach ensures that no matter how you need to display or manipulate the datetime, you have all the necessary context.
The typical data output from the plugin looks like this:
After implementing the richDate field, restart your Sanity Studio and create or edit a document with your new field.
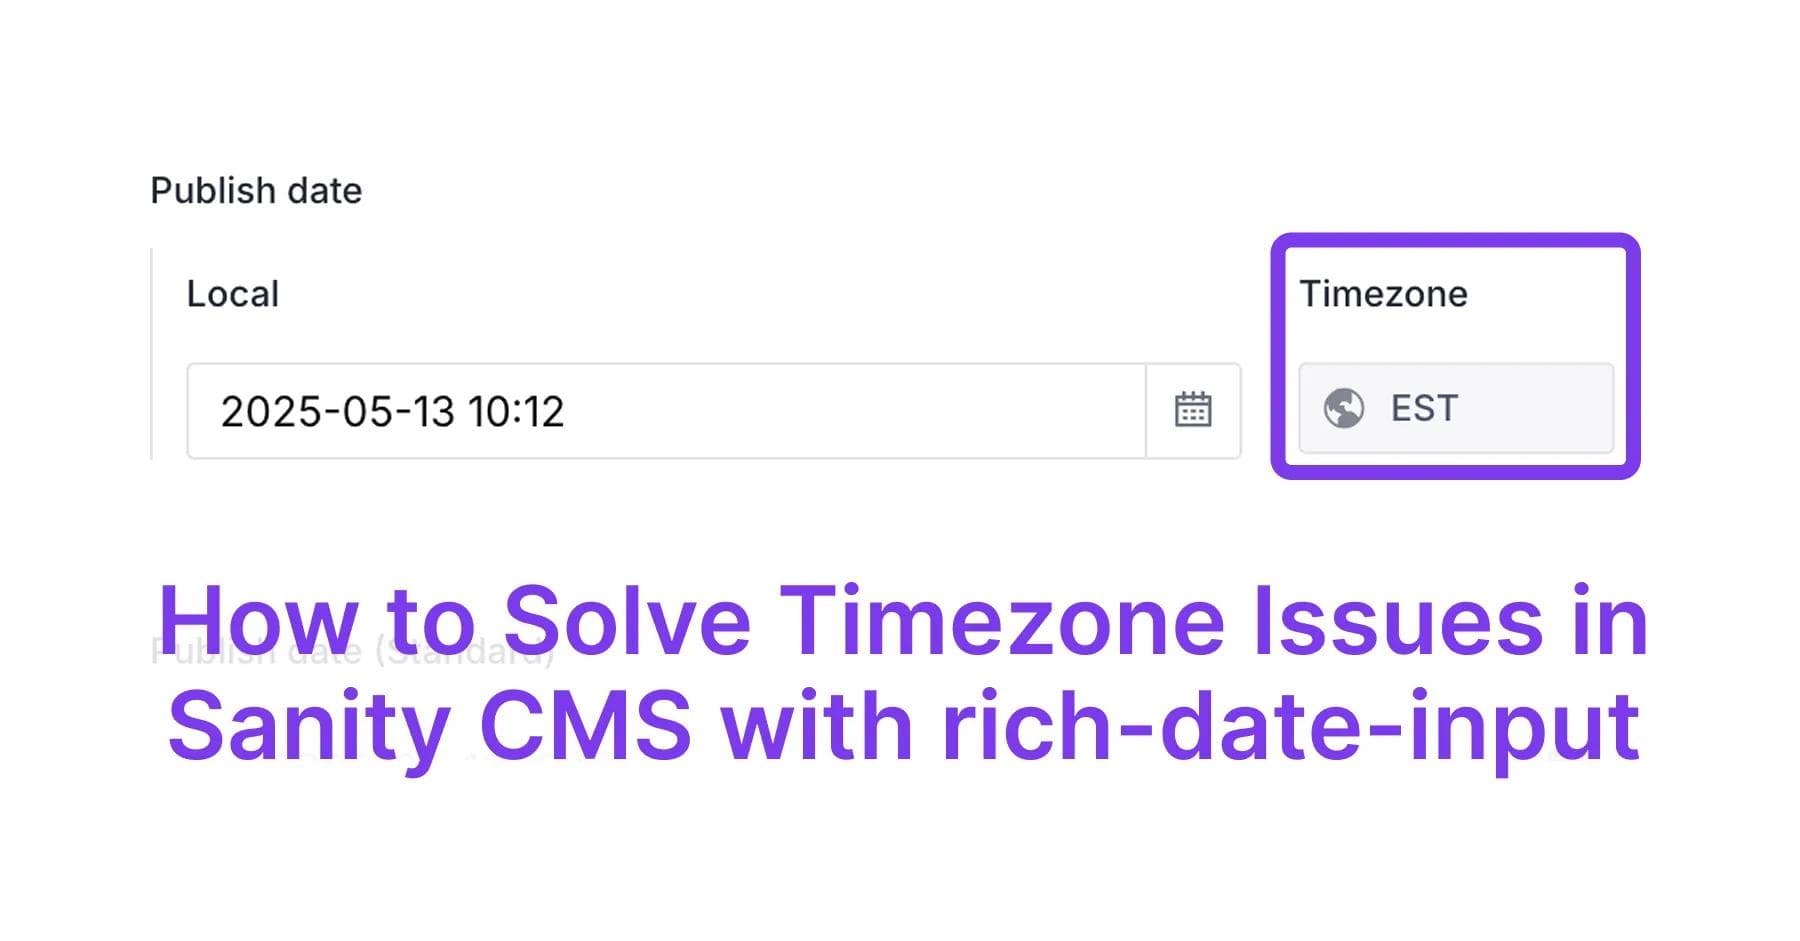
You'll notice a few key differences from the standard datetime input:
The date/time selector clearly shows the timezone
Users can optionally choose a different timezone if needed
The interface displays both the local time and UTC time
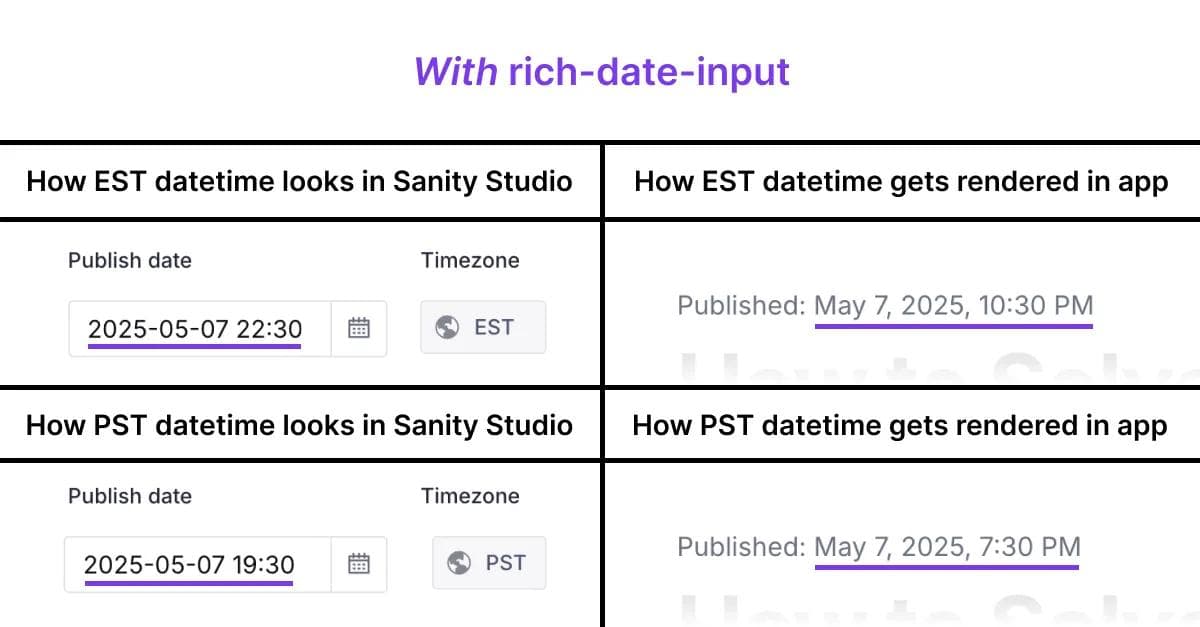
The datetimes and timezones set in Sanity Studio can be directly rendered in the frontend app, making work across distributed timezones easier and more intuitive. The timezone the editor sets is trusted, and directly referenced in-app.
When a user selects a date, the timezone will be stored in the document. They can choose a different timezone if desired. The date displayed will be the time as it would be in that timezone, and UTC will be calculated from the timezone and local time.
Step 5: Frontend Implementation
Retrieving and Rendering Rich Date Data
When querying your Sanity dataset, the richDate fields will return the complete structure:
This will return data with the full richDate structure:
Now, in your frontend code, you can choose how to display this information:
utils.js
import { format } from 'date-fns';// Display in the original input timezone (as the editor intended)const displayLocalTime = (richDate) => { if (!richDate) return ''; return format(new Date(richDate.local), 'MMMM d, yyyy h:mm a');};// Display in UTCconst displayUtcTime = (richDate) => { if (!richDate) return ''; return format(new Date(richDate.utc), 'MMMM d, yyyy h:mm a') + ' UTC';};// Display in the viewer's local timezoneconst displayViewerLocalTime = (richDate) => { if (!richDate) return ''; // Just use the UTC time and let the browser convert to the viewer's timezone return format(new Date(richDate.utc), 'MMMM d, yyyy h:mm a (zzz)');};
For most content purposes, you'll want to display the date in the original input timezone to match the editor's intent. For example, if an article mentions "the event happening on May 10th," you want that date to remain consistent regardless of who is viewing it.
Common Issues and Troubleshooting
1. Migration from Existing Datetime Fields
Problem: You have existing content using Sanity's default datetime fields.
Solution: Create a migration script that converts these fields to richDate format:
// Migration script exampleimport client from './sanityClient';// Fetch all documents with datetime fieldsconst documents = await client.fetch(`*[_type == "yourType" && defined(publishDate)]`);// Update each documentfor (const doc of documents) { const utcDate = doc.publishDate; // Create richDate structure const richDateValue = { _type: 'richDate', utc: utcDate, local: utcDate, // Note: You'll lose the original local time intention timezone: 'UTC', // Assuming UTC as default offset: 0 }; // Update the document await client .patch(doc._id) .set({publishDate: richDateValue}) .commit(); console.log(`Updated document ${doc._id}`);}
2. TypeScript Type Definitions
Problem: TypeScript doesn't recognize the richDate structure.
Problem: Dates display incorrectly or inconsistently on the frontend.
Solution: Use a reliable date library like date-fns or Luxon, and always specify which part of the richDate structure you're using:
import { parseISO, format } from 'date-fns';// Always be explicit about which datetime you're usingconst formatDate = (richDate) => format(parseISO(richDate.local), 'MMMM d, yyyy');
Real-world Use Cases
Publishing Schedules Across Timezones
For content teams working across multiple regions, richDate ensures that when an editor in Paris schedules content to go live at "9:00 AM local time," team members in New York understand that means 3:00 AM their time.
Event Calendars with Global Participants
For event platforms, storing the complete timezone context allows you to display event times appropriately for each viewer while maintaining the original intended time in the originating timezone.
Regional Content Releases
When coordinating product launches or marketing campaigns across different regions, richDate allows you to schedule region-specific timing while maintaining a clear global overview.
Advanced Techniques
Creating Custom UI Components
You can create custom UI components that leverage the rich date structure for specialized needs:
components/GlobalTimezoneDisplay.jsx
import React from 'react';const GlobalTimezoneDisplay = ({richDate}) => { if (!richDate) return null; const timezones = [ { name: 'New York', zone: 'America/New_York' }, { name: 'London', zone: 'Europe/London' }, { name: 'Tokyo', zone: 'Asia/Tokyo' }, // Add more as needed ]; // Calculate display times for each timezone const displayTimes = timezones.map(tz => { // Complex timezone calculation logic here // This is simplified return { name: tz.name, formattedTime: '...' // Use a timezone library for proper conversion }; }); return ( <div className="timezone-display"> <h4>Event Time Across Regions</h4> <ul> {displayTimes.map(dt => ( <li key={dt.name}> <strong>{dt.name}:</strong> {dt.formattedTime} </li> ))} </ul> </div> );};
Conclusion
The rich-date-input plugin for Sanity CMS solves one of the most persistent challenges in content management: correctly handling dates and times across timezones. By storing complete datetime context, it ensures that your content team's intentions are preserved regardless of where your content is viewed.
Implementing this plugin requires minimal effort but provides significant benefits:
Eliminated timezone confusion for content teams
Consistent date display across your platform
Flexible options for timezone handling in the frontend
Support for global content strategies
For teams working across multiple regions or publishing time-sensitive content, the rich-date-input plugin isn't just a nice-to-have; It's essential infrastructure that prevents mistakes and ensures smooth operations.
Next Steps
Consider migrating existing datetime fields to richDate
Create custom formatting utilities for your frontend
Implement timezone-aware scheduling logic
Review your content calendar for potential timezone issues